Baseball Cap Applique Design: A Hands-On Review for Real Embroidery Projects
When you spend as much time as I do auditioning machine embroidery designs for real customer orders, you learn to spot the ones that will stitch out smoothly and the ones that will cause headaches. I recently downloaded the Baseball Cap Applique Design from Creative Fabrica and put it through its paces on several projects. This review comes from the perspective of a working embroidery designer who needs designs that perform reliably, look polished on finished products, and justify the price tag when sold to end customers.
First Look at the Baseball Cap Applique Design
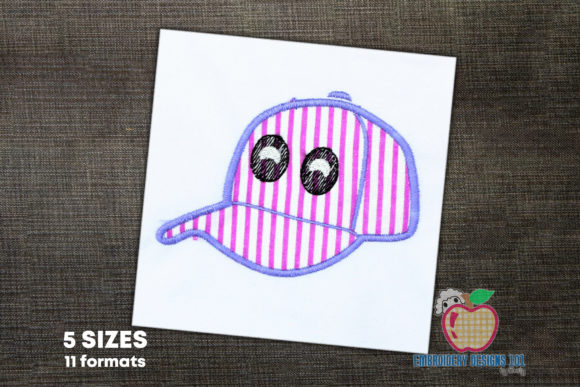
My initial impression of this Creative Fabrica embroidery design was positive. The baseball cap shape has a clean, classic silhouette that works well as a standalone motif or as part of a larger layout. The applique layers are clearly defined, and the step-by-step color changes suggest the digitizer planned for practical stitching. The mood is sporty but not overly aggressive, which makes it suitable for everything from custom apparel to personalized gifts. The detail level is moderate, with enough stitch definition to give the cap shape personality without overwhelming small hoop sizes.
For an applique design, the stitching personality matters. This one uses a combination of satin stitch edges and fill stitch areas that give the cap a dimensional look. The running stitch placement lines are clear, which helps when positioning fabric pieces during the applique process. If you have ever struggled with vague placement lines on a digital embroidery file, you will appreciate the thoughtfulness here.
How the Design Performs on Real Products
I tested the Baseball Cap Applique Design on several substrates to see how it holds up in production environments. Here is what I found across different product categories:
Custom Apparel and Tote Bags
On a cotton tote bag, the design stitched out cleanly with good registration. The satin stitch edges are dense enough to prevent fraying of the applique fabric, which is critical for items that will see frequent use. I used a medium-weight woven cotton for the applique fabric and a tear-away stabilizer behind the tote bag. The design handled the transition from fill stitch to satin stitch without any pull or distortion. For a tote bag design that needs to look professional in a boutique setting, this pattern delivers.
On a sweatshirt embroidery project, I used a fleece-backed fabric with a cut-away stabilizer. The design stitched smoothly, though I recommend checking the stitch density if you plan to use it on heavy knit fabrics. The fill stitch areas are not overly dense, which helps the fabric maintain its drape. I also tested it on a denim apron for a grilling-themed gift set, and the contrast between the applique fabric and the denim background was striking. The apron became an instant conversation piece.
Caps, Patches, and Small Hoop Projects
Given the name, the Baseball Cap Applique Design naturally belongs on caps. I stitched it onto a structured cap front using a cap frame and a medium-weight twill for the applique. The curved surface of a cap can be tricky for designs with large fill areas, but this pattern's layered approach worked well. The color changes are organized so that you can pause between layers to check placement. For commercial embroidery shops that produce custom caps in volume, this design is a reliable option.
I also used the design to create embroidered patches for a local sports team order. By stitching the design onto a patch blank with a hot-cut border, I was able to produce patches that looked factory-made. The satin stitch edge provided a clean finish that held up to the cutting process. If you sell handmade products at craft fairs or on Etsy, patch versions of this design could be a fast-moving item.
Baby Items, Kitchen Linens, and Nursery Decor
While the design is categorized under Sports, its visual appeal extends beyond athletic use. I stitched it onto a baby blanket using a soft flannel applique fabric, and the result was a cute, gender-neutral accent. For a kitchen towel project, I used a lightweight cotton applique and a small hoop. The design fit well within a 4x4 hoop, though I recommend confirming the exact hoop size on the Creative Fabrica product page before starting. On a pillow cover for a sports-themed nursery, the design added a playful touch that parents appreciated.
Practical Considerations for Real Embroidery Work
No design is perfect for every application, and the Baseball Cap Applique Design has a few considerations that experienced embroiderers will want to note.
Small Hoop Sizes and Tiny Lettering
This design does not include tiny lettering, which is a relief. Small text in applique designs often becomes unreadable after washing, especially on textured fabrics. The cap shape is large enough to be visible from a distance but not so large that it overwhelms a standard hoop. If you are working with a 5x7 hoop or larger, you will have plenty of room. For smaller hoops, check the design dimensions before purchasing.
Dense Stitch Areas and Fabric Choices
The fill stitch areas in the cap design are moderate in density. I did not experience any thread breaks or needle deflection during my tests. However, if you plan to use a very thick or textured fabric for the applique, such as fleece or faux fur, you may want to reduce the stitch density slightly in your software. On light-colored fabrics, the thread colors pop nicely. On dark fabrics, consider using a lighter applique fabric or a white underlay to maintain contrast. I always recommend testing on scrap fabric first, especially when switching between light and dark backgrounds.
Curved Cap Surfaces and Layered Details
The design's layered details stitch out in a logical order: placement line, tack-down stitch, trim step, then satin stitch edge. For curved cap surfaces, I found that using a firm stabilizer and a cap frame kept everything aligned. The design does not require excessive trimming between layers, which speeds up production. For digital embroidery file users who are new to cap embroidery, the clear step-by-step color changes make this a good learning project.
Impact on Product Value and Buyer Trust
When you sell finished products featuring a machine embroidery design, the quality of the stitching directly affects how customers perceive your brand. The Baseball Cap Applique Design produces a clean, professional look that builds trust. I used it on a set of personalized gifts for a corporate order, and the recipients commented on the crisp edges and the overall finish. That kind of feedback translates into repeat business and word-of-mouth referrals.
For Etsy sellers and small business owners, the visual appeal of this design in product photography is notable. The satin stitch edges photograph well, and the applique fabric adds a tactile element that shows up nicely in listing images. I created a printable mockup using the design file to test different color combinations before stitching, and that helped me choose thread colors that would appeal to my target audience. The design also works well for brand consistency if you offer a range of products with the same motif, such as a cap, a tote bag, and a towel set.
Practical Embroidery Notes Before You Stitch
Based on my experience with this design, here are a few steps I recommend before you commit to a production run:
- Test on scrap fabric first. Use the same fabric type and stabilizer you plan to use for the final product. This is the single most important step for any machine embroidery design.
- Check thread color contrast between the applique fabric, the background fabric, and the thread colors. A low-contrast combination can make the design look muddy.
- Review stitch density in your embroidery software. If the design is too dense for your chosen fabric, make adjustments before stitching.
- Confirm hoop size by checking the design dimensions on the Creative Fabrica product page. The description says it comes with multiple embroidery file formats, so verify that your machine can read the format you need.
- Compare light and dark fabric mockups before cutting applique fabric. The same thread colors can look completely different on a white background versus a navy background.
- Use proper stabilizer for your fabric type. Cut-away stabilizer for knits and stretchy fabrics, tear-away for wovens, and a firmer stabilizer for caps.
- Inspect small details after stitching. Look for any loose threads, gaps in the satin stitch, or areas where the applique fabric may have shifted.
- Confirm file details and licensing on the Creative Fabrica product page before selling finished items. The product description states that steps are separated by color changes, but you should verify the license terms for commercial use.
Final Thoughts on the Baseball Cap Applique Design
After using the Baseball Cap Applique Design on multiple projects, I can recommend it for apparel decorators, digital product sellers, and creative entrepreneurs who need a reliable, visually appealing applique motif. It performs well on a variety of substrates, from custom apparel to handmade gifts, and the stitch quality is consistent across different hoop sizes. The design's sporty but versatile mood makes it a good addition to a design assets library for anyone producing commercial embroidery or handmade products for sale.
If you are looking for a Creative Fabrica embroidery design that can transition from caps to tote bags to baby blankets without losing its visual appeal, this one is worth downloading. As always, take the time to test it on your own equipment and fabrics, and you will be rewarded with a finished product that your customers will love.