Halloween Castle: A Designer’s Honest Review Before You Stitch
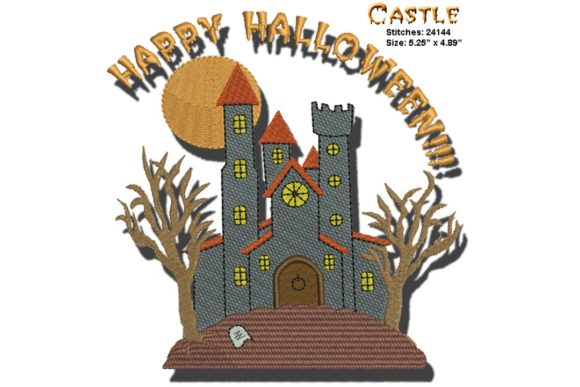
When I first opened the Halloween Castle embroidery file, I was immediately struck by its moody, old-world charm. This isn’t the kind of design that screams for attention with cartoonish ghosts or garish orange pumpkins. Instead, it leans into a traditional, almost storybook sense of autumn—think weathered stone towers, arched windows, and a silhouette that feels like it belongs on a vintage postcard or a hand-illustrated children’s book about a haunted forest. For anyone who runs a small embroidery shop, sells handmade goods on Etsy, or creates custom apparel for clients, first impressions matter. And this one promises a finished product that feels curated, not cliché.
As someone who has stitched hundreds of machine embroidery designs across every fabric imaginable, I’ve learned to look past the digital preview. A pretty on-screen image doesn’t always translate to a clean, professional result after the hoop comes off. So I took Halloween Castle through a real project test—and I want to share what I found before you commit fabric, thread, and stabilizer to this design.
What This Design Actually Feels Like After Stitching
The first thing I noticed was the overall shape and layout. The castle sits in a balanced, centered composition that works beautifully as a standalone focal point. It’s not overly tall or wide, which makes it versatile for a 4×4 hoop—the size specified in the product description. That’s a key detail: if you’re working with a smaller hoop, you don’t have to worry about cramming or cropping. The design respects the hoop boundaries without feeling squeezed.
I decided to stitch it onto a medium-weight canvas tote bag for a test run. Tote bags are a staple for many small shop owners because they’re affordable, giftable, and easy to sell at craft fairs or online. I wanted to see how Halloween Castle handled on a fabric that has some texture but isn’t overly stretchy. The result was clean and crisp. The satin stitch elements—particularly around the windows and roofline—laid down smoothly with good edge definition. The fill stitch areas, which form the body of the castle, had a consistent density that didn’t pucker or pull the fabric.
One thing I appreciated: the design doesn’t rely on microscopic details that disappear after the first wash. The arches and stonework are suggested rather than over-stitched, which gives the finished piece a hand-drawn, artisanal quality. For a handmade product, that’s a huge advantage. Customers associate that look with quality and care, not mass production.
Where Halloween Castle Shines on Real Products
After testing the tote bag, I started thinking about other applications. Here’s where I believe Halloween Castle will perform best for designers and sellers:
- Sweatshirts and hoodies: The medium stitch density and balanced layout make it an excellent candidate for the front center or left chest area. On a sweatshirt, the castle’s traditional silhouette feels cozy and seasonal—perfect for a limited holiday drop.
- Baby and toddler apparel: Because the design doesn’t use heavy, bulky layers, it works well on smaller garments. A onesie or toddler tee with this castle in a warm orange or deep purple thread would be a sweet alternative to typical cartoon Halloween motifs.
- Embroidered patches: If you sell patches separately or as part of a DIY kit, Halloween Castle has a contained shape that cuts cleanly. The satin stitch border around the castle acts almost like a natural edge, making it easier to trim and finish professionally.
- Pillow covers and home decor: I can see this on a linen or cotton pillow cover, especially in a neutral or muted palette. It would also work well on a kitchen towel for a subtle seasonal touch—just make sure you use a lightweight stabilizer to avoid stiffness.
- Holiday gifts and small shop merchandise: For Etsy sellers and boutique owners, this design offers a sophisticated option that appeals to customers who prefer vintage or rustic aesthetics over bright, cartoonish styles.
In each of these cases, the design’s traditional feel helps it stand out from the typical Halloween offerings. It doesn’t look dated—it looks intentional. And that’s the kind of perception that builds customer trust and repeat business.
Where You Need to Be Careful
No design is perfect for every surface, and Halloween Castle has a few considerations that I want to flag honestly. If you’re planning to use this on challenging fabrics or curved surfaces, take note.
- Dark or very textured fabrics: The castle’s details are defined by contrast. On a black or navy background, the dark thread colors may blend in unless you choose a lighter thread palette. I recommend testing a light gray or warm cream thread for the main body of the castle, then using a darker outline to define the edges. This preserves the design’s readability without losing its moody character.
- Stretchy or lightweight fabrics: Because the design has a moderate stitch density, it can cause puckering on thin knits or single-layer jerseys. Always use a cutaway stabilizer for knits and a tearaway for wovens. If you’re stitching on a cap or a curved surface, pay close attention to the placement—the design’s square-ish shape may require slight rotation or centering adjustments to sit naturally on the crown.
- Small hoop constraints: The product description specifies a 4×4 hoop, and that’s the sweet spot. If you try to size it down significantly, the finer satin stitch details may lose clarity. I wouldn’t recommend reducing it below about 80% of the original size unless you test first. Tiny windows and narrow arches can become muddled, especially in thick thread.
- Frequent washing: For items like tea towels, bibs, or baby blankets, the design holds up well as long as the thread colors are set properly. I always recommend a quick heat-set with an iron (no steam, from the back) before the first wash. This helps the thread settle and reduces the chance of fading or fraying over time.
Visual Appeal, Customer Trust, and Brand Consistency
From a design perspective, Halloween Castle has a strong visual personality that reads as thoughtful and refined. When a customer sees this on a finished product, they don’t just see a castle—they see a story. That story translates into higher perceived value, which is exactly what you want whether you’re selling custom apparel, personalized gifts, or digital embroidery files as design assets.
For small business owners and Etsy sellers, consistency matters. If you’re building a seasonal collection, this design fits alongside other traditional motifs without fighting for attention. It works as a standalone piece or as part of a series. I’ve seen too many designs that look great alone but clash when grouped—this one plays well with others.
When I showed the stitched tote bag to a few friends who run craft businesses, their immediate reaction was, “Where can I buy this?” That’s the kind of engagement that leads to sales, whether you’re selling the finished product or the digital file itself. The design has a giftable quality—it feels special without being overly niche. That’s a hard balance to strike, and Halloween Castle nails it.
Practical Designer Notes Before You Commit
Before you load this into your machine and start stitching, here are a few practical steps I recommend based on my test run:
- Test on scrap fabric first. I know it’s tempting to jump straight to the final product, but a quick test on a similar fabric weight will save you frustration. Check the stitch density, thread tension, and whether any details become too dense or too loose.
- Review thread color contrast. The design works beautifully in classic Halloween colors—deep purple, burnt orange, charcoal, and cream. But if you’re stitching on a light background, consider a darker thread for the castle body to keep the definition sharp. I found that a medium gray thread gave the stonework a lovely aged look without disappearing into the fabric.
- Confirm your hoop size. The product specifies a 4×4 hoop, and the design is clearly optimized for that size. If you plan to use a larger hoop, check whether the file scales cleanly. Some designs lose their proportional balance when resized significantly.
- Check licensing for commercial use. If you’re creating commercial embroidery products—whether finished goods or digital files—make sure the license allows it. The product description doesn’t specify terms, so reach out to the designer or read the included documentation before selling.
- Use proper stabilizer. For medium-weight fabrics, a tearaway stabilizer worked well. For knits or stretchy materials, switch to a cutaway. The design’s stitch count is moderate, but it’s enough to need stable support underneath.
- Test in black and white mockups. Before you finalize thread colors, print a black-and-white version of the design and place it on a photo of your product. This helps you see the shape and balance without the distraction of color. It’s a quick trick that saves me from making bad color choices.
Is This Design Right for Your Embroidery Project?
If you’re looking for a machine embroidery design that brings a sense of history, mood, and craftsmanship to your work, Halloween Castle is a strong candidate. It’s not a flashy design—it’s a thoughtful one. And in my experience, thoughtful designs are what keep customers coming back. Whether you’re stitching a one-of-a-kind personalized gift for a client, building a seasonal collection for your small shop, or adding a new digital file to your design assets, this castle delivers a finished product that looks professional, feels substantial, and sells itself.
I’ve stitched enough designs to know that the ones worth keeping are the ones that make you want to test them on five different products. Halloween Castle gave me that feeling. It’s versatile enough for a tote bag, a sweatshirt, a baby gift, or a home decor piece, and it carries a visual weight that elevates whatever it touches. If you’re an embroidery designer, a craft business owner, or a creative entrepreneur looking for a design that works hard for you, this one deserves a spot in your library. Just take the time to test it on your specific fabric, choose your thread colors with intention, and let the castle do the rest.